First steps – Learn the basics

You need to listen to the song to know that. Usually users share them in the comment section for tab…
People believe that the Ukulele is one of the easiest instruments to play, and they are quite right: it will just take you a few minutes to learn some chords and play your first song. (Being an accomplished player is another story…)
First, you need to tune your uke. As for any instrument, it’s very important to play on a ukulele that’s tuned. Next thing is holding the ukulele.
Holding the Ukulele
If you ever played acoustic guitar, bass guitar, and so on, you will not have any problem. If not… you won’t have any problem either! I guess you’ve already seen a guitar player, right? Well, it’s the same thing. If you are right-handed, your left hand will be in charge of the neck, and your right hand will strum or pluck the strings. If you are left-handed, it’s just the other way around.
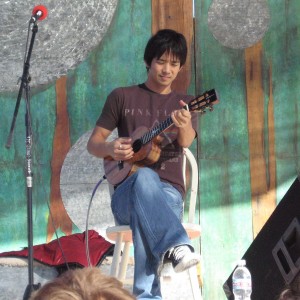
Jake Shimabukuro playing the ukulele seated. Photo by Surfsupusa (public domain)
Simply pull the strings, from the fourth to the first one, with your right thumb. If your tuning is accurate, you will hear the distinctive sound known as my dog has fleas. What? My dog has fleas? Don’t freak out, it’s a mnemonic rule, the re-entrant way of tuning a ukulele is similar to this sentence… with a little imagination.
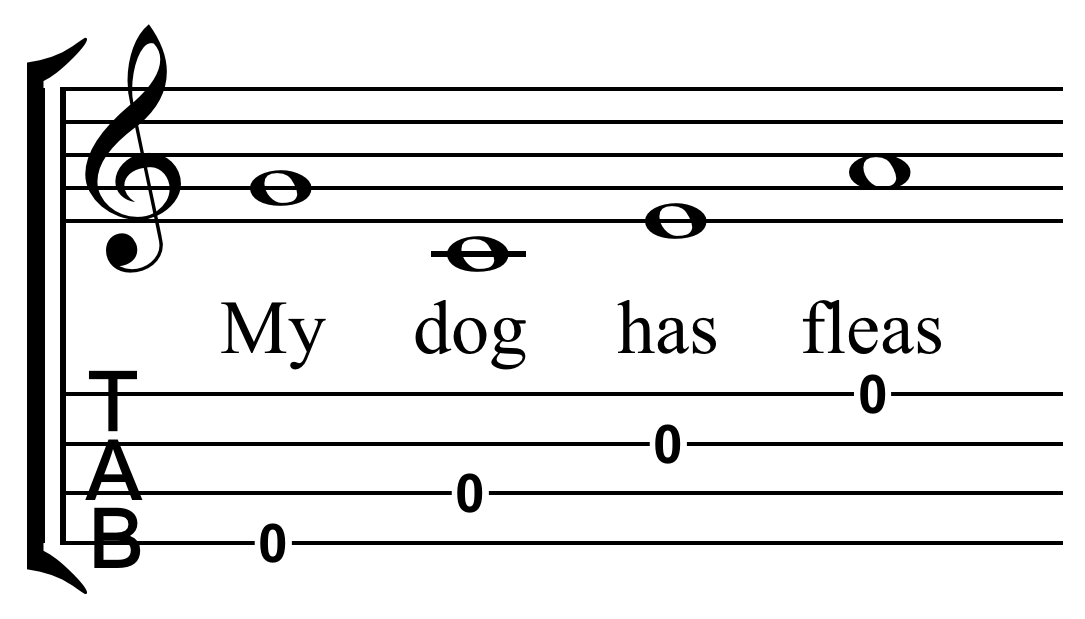
My dog has fleas
Illustration by Hyacinth (CC BY-SA 3.0 – original)
Your first 2 chords
The mere fact of pulling the strings in the air (without pressing any finger from your left hand) is a chord. Here’s your first chord! You just played a C6.

C6 chord on the Soprano
As it doesn’t deserve much credit, we’re going to play our first chord involving our left hand. We simply have to pull the first string on the third fret (this is the C note). As a matter of fact, your finger must be in the space between the second and third fret, as close as possible to the third one without coming on top of it, and you must apply just the right amount of pressure required to make it sound right. Insufficient pressure will sound faint or won’t sound at all. An excessive pressure causes tune-out. It requires some practice. By doing so, we actually shorten the string length. Through shortening the string length, we increase the oscillation frequency, and therefore it sounds higher.
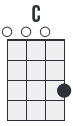
C chord on the Soprano
If we pull the strings again in the air, we will be playing the C chord (learn how chords are formed). Normally, you should find chord diagrams which tell us in graphic way which frets to press on. You can check out our article on chords, may you have any doubt.
The right hand
We are now going to focus on the right hand (the left one, for the left-handed). This hand will be in charge of making strings produce sound, by making them vibrate. In general, we can use any finger from the right hand, though the thumb, the index and the middle finger are the most used ones. There is no secret to that, and it will come out instinctively. The technique consists in slightly pressuring from top to bottom (“towards the ground”), or in the opposite direction (“towards the sky”), on the string one wishes to play. Thanks to this very pressure, the string will escape from the pressure made by the finger and will start to vibrate. We recommend using your nail, though you can use your finger tip or a felt pick (avoid using guitar picks).
In order to practice, we can take any chord and play it one string string after the other, trying to be as precise as possible. We can go on and combine strings and fingers in different ways. It’s important to go slowly and to control your movement at all times.
We make it a little more complicated by playing two strings at a time, using two strings. You can try combining thumb and index, thumb and middle finger, index and middle finger, and so on. Simple stuff, right? Let’s continue with the strumming.
Strumming
In order to strum, one has to make a rhythmical movement with his right hand (once again, with the left-hand for the left-handed). The most basic strumming consists in playing 4 strings from top to bottom, and from bottom to top with the tip of your index (with the nail, if possible). Here is an interesting video to illustrate this:
As we said, the most basic pattern is to play with rhythm (for example quarter notes) and alternate the upward and downward movements. The rhythm patterns are written using the ^ symbol to indicate an upstroke, and the v symbol to indicate a downstroke. This is often written as v^v^v^v^ or dudududu (for up/down), but the traditional notation is as follows (to learn more about music meters, check this page):
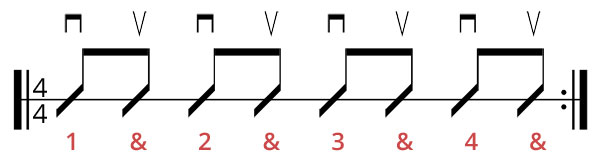
Traditional rhythm notation
Here is how to play the above illustration:
As you can imagine, there are countless rhythm patterns for us to strum. We can make as many combinations as we want, such as down-down-up-down for instance, or combine various musical figures, insert rests, and so on. Our imagination is the limit.
One one the most famous strumming pattern for you to learn is vv^^v^ (dduudu):
There are some more complex strumming techniques, such as rolls or syncopated patterns, but let’s leave that for later. Based on what I just explained to you, you just need to learn 4 or 5 basic chords so you can play lots of songs and practice your strumming skills.
On top of the C chord, let me teach you the following chords to begin with: F, G and Am.
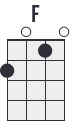
F chord on the Soprano
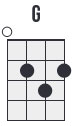
G chord on the Soprano
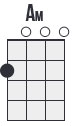
Am chord on the Soprano
You can play a lot of songs with these 4 chords. (if you search for “C, F, G, Am”, you’ll find almost 2 000 songs…)
Here is my quick 4-chords songs selection:
- Save Tonight (Eagle-Eye Cherry)
- Let it Be (The Beatles)
- I’m Yours (Jason Mraz)
- You’re beautiful (James Blunt)
- Learning to Fly (Tom Petty)
- No Woman no Cry (Bob Marley)
- Ho Hey (The lumineers)
- My my hey hey (Neil Young)
Practice changing chords, in very slowly in the beginning, until your fingers “memorize” the positions (muscular memory). You’ll end up playing them without thinking about it. Gradually increase the speed. As for strumming, feel free to play all the variations that cross your mind.
Featured image © morganka – fotolia.com
great site!!
thank you!
Just starting out. It’s a lot of finger twisting for 78 year old fingers.
you’ll make it bro! =)
Are thee any more lessons?
Yes, 20 More lessons to be published soon. + an Android app!
I’m finding it next to impossible to strum and sing at the same time. I’ve been trying for weeks. I can sign and do the easier just fine. There’s a glitch in my brain. So, I’m wondering if I can just strum DUDUDUDUDU for all songs. After all, I just want to have a good time playing, and be able play simple songs I’ve made up. I would love your feedback.
There’s an interesting technique explained on this site (it’s a guitar site but technique is the same), you should probably read this lesson: http://www.tabs4acoustic.com/en/guitar-lessons/singing-and-playing-the-guitar-at-the-same-time-198.html
I have to say I use more or less the same trick to count the beats, and it helps a lot.
Hi.
I just begin playing ukelele without any knowledge in music.
When there is a chord written above the lyrics, how many times do I need to strum, and how do I get this information on a tab ?
Thanks for your help, I am a bit lost.
You need to listen to the song to know that. Usually users share them in the comment section for tab sites such as ukulele-tabs.com
But if you’re new to uke you can just strum down each chord you see one time.
You can also apply one of the strumming patterns we listed here: https://learnplayuke.com/basic-rhythm-patterns-for-ukulele/
Or use one of the 20 strumming patterns listed there (with audio files): https://www.ukulele-tabs.com/strumming-patterns.html